How to Redirect www to non-www Domain for Ghost on DigitalOcean
If you're anything like me, soon after you set up Ghost with a DigitalOcean 1-click install you stumbled upon the fact that your Ghost site didn't load when you added www in front of your domain name. But somehow it loaded perfectly fine when you typed kyleunboxed.com without the www. How could this be? Aren't they both the same address?
Unfortunately www.kyleunboxed.com and kyleunboxed.com are considered two different URLs. In this post I will walk you through step by step in getting both www and non-www domains to direct to your Ghost blog.
Step 1: Add Your DNS Record
You will need to go to your DNS settings and create a new A record for the www version of your site. This A record must direct to the same ip address as the existing A record that you are using for your Ghost site.


Notice how both of my A records direct to the same IP address.
Step 2: Connect To Your Droplet
SSH into your droplet or launch a droplet console from your DigitalOcean dashboard to get command line access to your Ghost Droplet.
Step 3: Setup Your www Domain Redirect
Change to the ghost-mgr user, then move to the ghost install directory
cd /var/www/ghost
Now we will follow the steps from the Ghost Documentation to set up SSL for additional domains
First, set ghost to use your new www url for configuration
ghost config url https://www.my-domain.com
Second, use Ghost-CLI to generate an SSL configuration for the new www url. You will have to enter an email address to generate the let-encrypt SSL certificate.
ghost setup nginx ssl
Now we set our Ghost domain back to the original canonical domain
ghost config url https://my-domain.com
For this last part, we need to edit the newly generated Nginx config files for your www domain. You will see the location of these in the output of the ghost setup nginx ssl command. For me they were located at /etc/nginx/sites-available/
cd /etc/nginx/sites-available/
Then open up and edit the two conf files for the new www domain.
sudo nano www.my-domain.com.conf
Remove everything inside of the first location { section and replace it with
return 301 https://my-canonical-domain.com$request_uri;
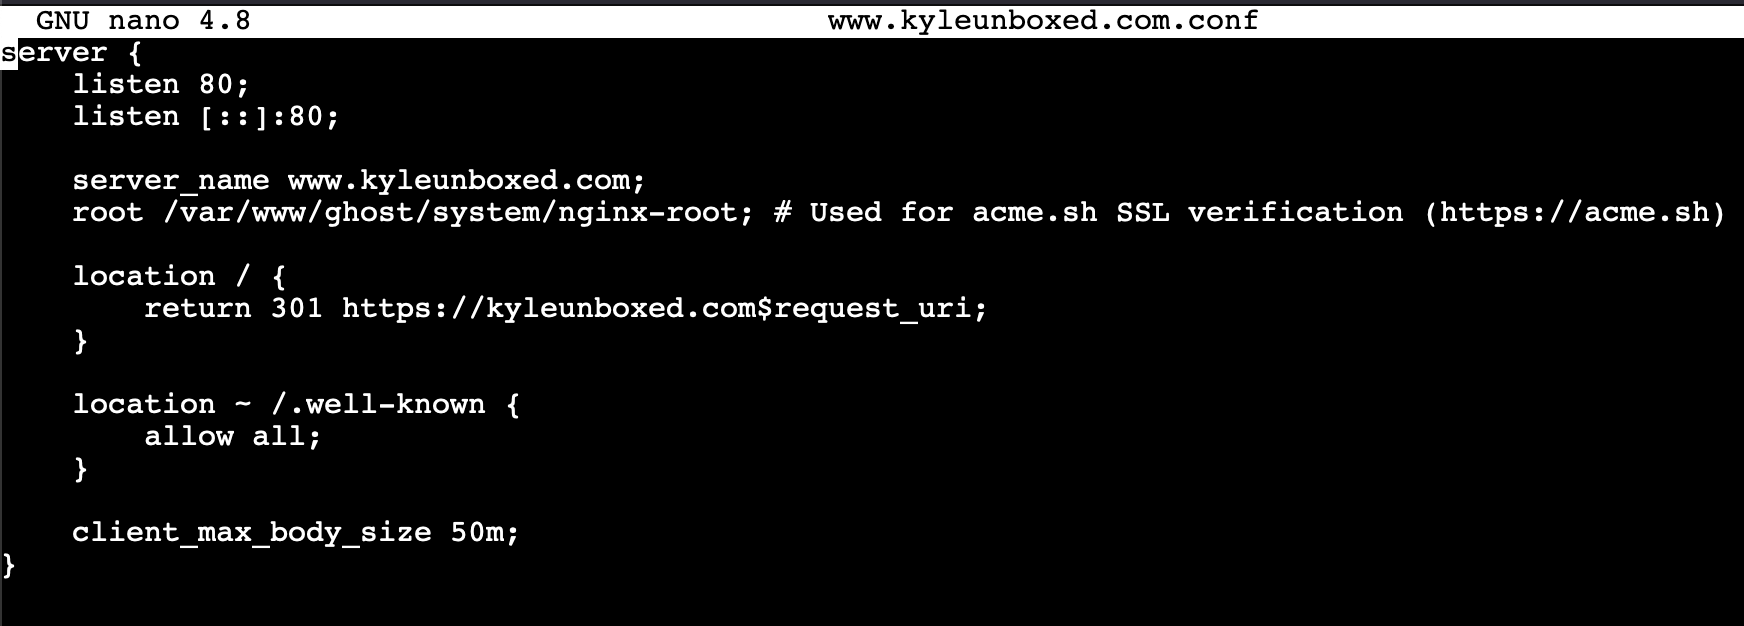
Keep the .well-known location block - this is used for renewing certificates.
Now all we need to do is run sudo nginx -t to verify the conf files and sudo nginx -s reload to restart nginx.
Now you should be able to go to go to your www domain and be redirected to your Ghost site. Congrats!
If this tutorial helped you out, consider subscribing to receive new posts. You'll get my new content, including plenty of tips on setting up and getting the most out of your Ghost blog. And of course, no spam ever.